Setting up Central Management and Tenant Clusters
Below are the instructions for setting up Klutch's Central Management Cluster, which includes Crossplane, konnector, and kube-bind. While other cloud providers are supported as well, for the purpose of this example, we will use Amazon EKS. These instructions also cover the configuration of the tenant cluster with bindings to services exported in the Central Management Cluster.
Prerequisites
- Provision an EKS cluster with a minimum of 3 nodes, each node should at least be t3a.xlarge or equivalent.
- Set up a VPC with 3 subnets.
- Make sure eksctl is installed and configured correctly.
Overview
To successfully manage data services using Klutch, several components must be deployed. konnector is deployed on each consumer cluster that wants to manage its data services with Klutch. Klutch itself is deployed on a central management cluster. konnector is configured to correctly interact with kube-bind running in Klutch so each service running on the consumer cluster doesn't need to be configured to call Klutch. Instead, the services can use Klutch to manage their data services by interacting with konnector.
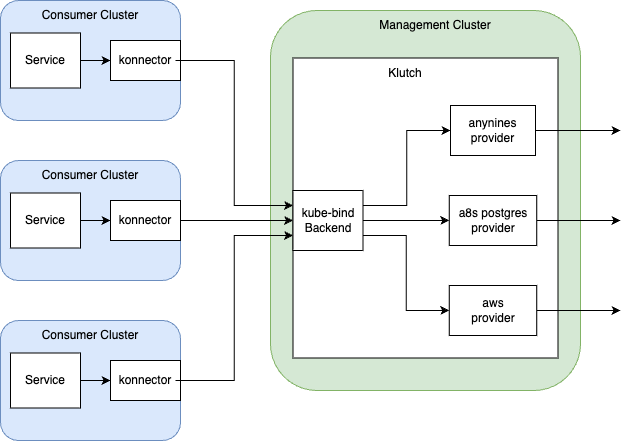
The following instructions will install the services that are necessary to use Klutch. First, the provider anynines is installed in the management cluster. This is done by installing both the provider itself and configuration that the provider needs to properly run.
Then, the kube-bind backend is deployed in the management cluster. The installation for kube-bind includes permission configuration that needs to be set up so the tenant cluster can properly access the backend.
Lastly, konnector must be installed on the tenant cluster. After installation, konnector is bound to the kube-bind backend. This is how the tenant cluster can call Klutch in the management cluster.
The current instructions only include deployment of provider-anynines. This product is in current development and more providers can be expected soon!
Setup Klutch Central Management cluster
Deploy Crossplane and provider-anynines
Prerequisites
- Helm version v3.2.0 or later
- Crossplane version 1.15.0 or newer must be installed on the cluster.
- Additionally, ensure the Server-Side-Apply flag is enabled for claims by setting
--set args='{"--enable-ssa-claims"}'.
- Additionally, ensure the Server-Side-Apply flag is enabled for claims by setting
- Crossplane CLI
Install provider-anynines
You can install provider-anynines using the provided packages:
-
Install the anynines provider package, by applying these manifests:
apiVersion: pkg.crossplane.io/v1
kind: Provider
metadata:
  name: provider-anynines
spec:
  package: "public.ecr.aws/w5n9a2g2/anynines/provider-anynines:v1.2.0"
  runtimeConfigRef:
    name: provider-anynines
---
apiVersion: pkg.crossplane.io/v1beta1
kind: DeploymentRuntimeConfig
metadata:
  name: provider-anynines
spec:
  deploymentTemplate:
    spec:
      selector: {}
      template:
        spec:
          containers:
          - name: package-runtime
            readinessProbe:
              httpGet:
                path: /healthz
port: 8081 -
Wait for the anynines provider to become healthy:
kubectl get providers -w -
Once the provider is healthy, install the configuration package:
crossplane xpkg install configuration public.ecr.aws/w5n9a2g2/anynines/dataservices:v1.2.0 -
Wait till the configuration package state is healthy before moving on to the next steps.
kubectl get configuration -w
Install ProviderConfig
To configure the provider-anynines, you will need to update and apply the following yaml file for each a9s Data
Service you want to support. Replace the <data-service> placeholder in the following YAML file with the
corresponding value from the table below for the Data Service you want to deploy:
| Data Service | Data-service Value |
|---|---|
| a9s Redis | redis |
| a9s Messaging | messaging |
| a9s Logme2 | logme2 |
| a9s Prometheus | prometheus |
| a9s Search | search |
| a9s MongoDB | mongodb |
| a9s MariaDB | mariadb |
| a9s PostgreSQL | postgresql |
Additionally, substitute the remaining placeholder values denoted by < > with the actual variable values, as
described for each Data Service you want to support.
After making these updates, apply the modified yaml file to enact the changes.
apiVersion: v1
kind: Secret
metadata:
  name: <data-service>-service-broker-creds
  namespace: crossplane-system
type: Opaque
data:
  username: <service-broker-username-base64-encoded>
  password: <service-broker-password-base64-encoded>
---
apiVersion: dataservices.anynines.com/v1
kind: ProviderConfig
metadata:
  name: <data-service>-service-broker
spec:
  url: <service-broker-url> # e.g. http://example.com:3000
  providerCredentials:
    source: Secret
    username:
      secretRef:
        namespace: crossplane-system
        name: <data-service>-service-broker-creds
        key: username
    password:
      secretRef:
        namespace: crossplane-system
        name: <data-service>-service-broker-creds
        key: password
---
apiVersion: v1
kind: Secret
metadata:
  name: <data-service>-backup-manager-creds
  namespace: crossplane-system
type: Opaque
data:
  username: <backup-manager-username-base64-encoded>
  password: <backup-manager-password-base64-encoded>
---
apiVersion: dataservices.anynines.com/v1
kind: ProviderConfig
metadata:
  name: <data-service>-backup-manager
spec:
  url: <backup-manager-url>  # e.g. http://example.com:3000
  providerCredentials:
    source: Secret
    username:
      secretRef:
        namespace: crossplane-system
        name: <data-service>-backup-manager-creds
        key: username
    password:
      secretRef:
        namespace: crossplane-system
        name: <data-service>-backup-manager-creds
        key: password
To verify that the providerconfigs are correct, check their status and wait for them to all be "healthy":
kubectl get providerconfigs
The output should look something like this:
NAME                        AGE     HEALTHY
postgresql-backup-manager   10s     true
postgresql-service-broker   10s     true
...
Deploy Kube-bind
Prerequisites
- Cert-Manger for this installation we are using cert-manager but you can freely choose your own certificate managers.
The Management cluster needs to have kube-bind CRDs installed. Apply the required CRDs with the following command:
kubectl apply -f https://anynines-artifacts.s3.eu-central-1.amazonaws.com/central-management/v1.3.0/crds.yaml
To grant the necessary permissions for kube-bind, create a ClusterRole by applying the following yaml:
apiVersion: rbac.authorization.k8s.io/v1
kind: ClusterRole
metadata:
 name: kube-binder
rules:
- apiGroups:
 - "kube-bind.io"
 resources:
 - "apiserviceexportrequests"
 verbs: ["create","delete","patch","update","get","list","watch"]
- apiGroups:
 - ""
 resources:
 - "namespaces"
 verbs: ["get"]
- apiGroups:
 - ""
 resources:
 - "secrets"
 verbs: ["get", "watch", "list"]
- apiGroups:
 - "kube-bind.io"
 resources:
 - "clusterbindings"
 verbs: ["get", "watch", "list"]
- apiGroups:
 - "kube-bind.io"
 resources:
 - "clusterbindings/status"
 verbs: ["get","patch","update"]
- apiGroups:
 - "kube-bind.io"
 resources:
 - "apiserviceexports"
 verbs: ["get", "watch", "list"]
- apiGroups:
 - "kube-bind.io"
 resources:
 - "apiserviceexports/status"
 verbs: ["get","patch","update"]
- apiGroups:
 - "kube-bind.io"
 resources:
 - "apiservicenamespaces"
 verbs: ["create","delete","patch","update","get","list","watch"]
Create APIServiceExportTemplates to make the A9s API for a specific Data Service available as a service to tenant
clusters.
Replace the <resource> placeholder in the following YAML file with the corresponding value from the table below for
the Data Service you want to deploy:
| Data Service | Resource Value |
|---|---|
| a9s Redis | redisinstances |
| a9s Messaging | messaginginstances |
| a9s Logme2 | logme2instances |
| a9s Prometheus | prometheusinstances |
| a9s Search | searchinstances |
| a9s MongoDB | mongodbinstances |
| a9s MariaDB | mariadbinstances |
| a9s PostgreSQL | postgresqlinstances |
kind: APIServiceExportTemplate
apiVersion: bind.anynines.com/v1alpha1
metadata:
  name: "<resource>"
  namespace: crossplane-system
spec:
  APIServiceSelector:
    resource: <resource>
    group: anynines.com
For ServiceBinding apply the following:
kind: APIServiceExportTemplate
apiVersion: bind.anynines.com/v1alpha1
metadata:
  name: "servicebindings"
  namespace: crossplane-system
spec:
  APIServiceSelector:
    resource: servicebindings
    group: anynines.com
  permissionClaims:
    - group: ""
      resource: secrets
      version: v1
      selector:
        owner: Provider
    - group: ""
      resource: configmaps
      version: v1
      selector:
        owner: Provider
For Backup apply the following:
kind: APIServiceExportTemplate
apiVersion: bind.anynines.com/v1alpha1
metadata:
  name: "backups"
  namespace: crossplane-system
spec:
  APIServiceSelector:
    resource: backups
    group: anynines.com
For Restore apply the following:
kind: APIServiceExportTemplate
apiVersion: bind.anynines.com/v1alpha1
metadata:
  name: "restores"
  namespace: crossplane-system
spec:
  APIServiceSelector:
    resource: restores
    group: anynines.com
OpenID Connect configuration
We've adopted the OpenID Connect (OIDC) method for enabling single sign-on (SSO) into our Kubernetes cluster.
We'll need an audience mapper that adds the audience kube-bind to tokens issued.
In a wider context, an audience mapper allows you to add or modify audiences (applications or services) intended to use a token.
To enable bindings without user interaction, for example created by a script or other automation the OIDC backend needs to support the client credentials grant type
You can find an example of how to set up OIDC using KeyCloak.
Apply the backend
Create a namespace for bind.
kubectl create ns bind
In the yaml file, make sure to replace the placeholder values indicated by <> with their
corresponding actual values. The values that require updating include:
| Placeholder | Description |
|---|---|
<signing-key> | Cookies signing key |
<encryption-key> | Cookies encryption key |
<certificate> | Kubernetes cluster certificate |
<kubernetes-api-external-name> | External address of the kubernetes api |
<oidc-issuer-client-url> | OIDC client url |
<oidc-issuer-client-secret> | OIDC client secret |
<backend-host> | Backend host address |
<Add-your-email-here> | Email address used for Certificate Authority registration |
But before we update the yaml file we need to either get or generate these values.
Signing and Encryption keys generation
Signing and encryption keys can be generated using the following command
openssl rand -base64 32
OIDC Credentials
Your OIDC provider will provide the OIDC client URL and client secret used for
<oidc-issuer-client-id> and <oidc-issuer-client-secret>. You can locate these
values within the settings or configuration section of your chosen OIDC provider.
Instructions for setting up OIDC using KeyCloak can be found here.
ACME email address
The email specified in <Add-your-email-here> should be the email used for
registering with a certificate authority (CA), such as Let's Encrypt. In this
guide suggests using Let's Encrypt with the ACME protocol. If a different approach
is preferred, please update the Issuer in the provided yaml manifest.
Kubernetes cluster certificate
The kubernetes cluster certificate can be found in kubeConfig clusters.certificate-authority-data.
Kubernetes api external name
The kubernetes api external name can be found in kubeConfig clusters.server.
backend-host
Create a service of type LoadBalancer.
apiVersion: v1
kind: Service
metadata:
  name: anynines-backend
  namespace: bind
spec:
  type: LoadBalancer
  ports:
    - protocol: TCP
      name: anynines-backend
      port: 443
      targetPort: 9443
  selector:
    app: anynines-backend
Now get the service
kubectl get services -n bind
You'll see a similar output.
NAME               TYPE           CLUSTER-IP    EXTERNAL-IP               PORT(S)         AGE
anynines-backend   LoadBalancer   10.10.10.10   something.amazonaws.com   443:32686/TCP   6m29s
Use the value of EXTERNAL-IP as backend-host
Creating the backend
Then apply the following yaml file within the bind namespace. This action will
deploy the anynines-backend Deployment, Services, Ingress, Configmaps and Secrets
for kube-bind.
The instructions assume the usage of the Nginx Ingress Controller. If a different
controller is used, please adjust the ingressClassName value in
networking.k8s.io/v1/Ingress to match your Ingress controller in the following yaml
manifest. Additionally, modify the cert-manager.io/v1/Issuer if needed.
Moreover, this setup assumes the use of Let's Encrypt CA with ACME protocol.
Adjust cert-manager.io/v1/Issuer and networking.k8s.io/v1/Ingress in the
following yaml file if you are using a different CA.
---
apiVersion: apps/v1
kind: Deployment
metadata:
  name: anynines-backend
  namespace: bind
  labels:
    app: anynines-backend
spec:
  replicas: 1
  selector:
    matchLabels:
      app: anynines-backend
  strategy:
    type: Recreate
  template:
    metadata:
      labels:
        app: anynines-backend
    spec:
      serviceAccountName: anynines-backend
      containers:
        - name: anynines-backend
          image: public.ecr.aws/w5n9a2g2/anynines/kubebind-backend:v1.3.0
          args:
            - --namespace-prefix=cluster
            - --pretty-name=anynines
            - --consumer-scope=Namespaced
            - --oidc-issuer-client-id=$(OIDC-ISSUER-CLIENT-ID)
            - --oidc-issuer-client-secret=$(OIDC-ISSUER-CLIENT-SECRET)
            - --oidc-issuer-url=$(OIDC-ISSUER-URL)
            - --oidc-callback-url=$(OIDC-CALLBACK-URL)
            - --listen-address=0.0.0.0:9443
            - --cookie-signing-key=$(COOKIE-SIGNING-KEY)
            - --cookie-encryption-key=$(COOKIE-ENCRYPTION-KEY)
            - --external-address=<kubernetes-api-external-name>
            - --external-ca-file=/certa/ca
          env:
            - name: OIDC-ISSUER-CLIENT-ID
              valueFrom:
                secretKeyRef:
                  name: oidc-config
                  key: oidc-issuer-client-id
            - name: OIDC-ISSUER-CLIENT-SECRET
              valueFrom:
                secretKeyRef:
                  name: oidc-config
                  key: oidc-issuer-client-secret
            - name: OIDC-ISSUER-URL
              valueFrom:
                secretKeyRef:
                  name: oidc-config
                  key: oidc-issuer-url
            - name: OIDC-CALLBACK-URL
              valueFrom:
                secretKeyRef:
                  name: oidc-config
                  key: oidc-callback-url
            - name: COOKIE-SIGNING-KEY
              valueFrom:
                secretKeyRef:
                  name: cookie-config
                  key: signing-key
            - name: COOKIE-ENCRYPTION-KEY
              valueFrom:
                secretKeyRef:
                  name: cookie-config
                  key: encryption-key
          resources:
            limits:
              cpu: "2"
              memory: 2Gi
            requests:
              cpu: "100m"
              memory: 256Mi
          volumeMounts:
            - name: ca
              mountPath: /certa/
      volumes:
        - name: oidc-config
          secret:
            secretName: oidc-config
        - name: cookie-config
          secret:
            secretName: cookie-config
        - name: ca
          secret:
            secretName: k8sca
            items:
              - key: ca
                path: ca
---
apiVersion: v1
kind: Secret
metadata:
  name: cookie-config
  namespace: bind
type: Opaque
stringData:
  signing-key: "<signing-key>" #"openssl rand -base64 32"
  encryption-key: "<encryption-key>" #"openssl rand -base64 32"
---
apiVersion: v1
kind: Secret
metadata:
  name: k8sca
  namespace: bind
type: Opaque
data:
  ca: <certificate>
---
apiVersion: v1
kind: Secret
metadata:
  name: oidc-config
  namespace: bind
type: Opaque
stringData:
  oidc-issuer-client-id: "kube-bind"
  oidc-issuer-client-secret: "<oidc-issuer-client-secret>"
  oidc-issuer-url: "<oidc-issuer-client-url>"
  oidc-callback-url: "https://<backend-host>:443/callback"
---
apiVersion: v1
kind: ServiceAccount
metadata:
  name: anynines-backend
  namespace: bind
---
apiVersion: rbac.authorization.k8s.io/v1
kind: ClusterRoleBinding
metadata:
  name: anynines-backend
  namespace: bind
roleRef:
  apiGroup: rbac.authorization.k8s.io
  kind: ClusterRole
  name: cluster-admin
subjects:
  - kind: ServiceAccount
    name: anynines-backend
    namespace: bind
---
apiVersion: networking.k8s.io/v1
kind: Ingress
metadata:
  name: anynines-backend
  namespace: bind
  annotations:
    cert-manager.io/issuer: letsencrypt-prod # Adjust if not Let's Encrypt
spec:
  ingressClassName: nginx # Adjust if not Nginx Ingress Controller
  tls:
    - secretName: anynines-backend-tls
      hosts:
       - "<backend-host>"
  rules:
    - host: "<backend-host>"
      http:
        paths:
          - pathType: Prefix
            path: "/"
            backend:
              service:
                name: anynines-backend
                port:
                  number: 443
---
apiVersion: cert-manager.io/v1
kind: Issuer
metadata:
 name: letsencrypt # Adjust if not  Let's Encrypt
 namespace: bind
spec:
 acme:
   # The ACME server URL
   server: https://acme-v02.api.letsencrypt.org/directory # Adjust if not Let's Encrypt
   email: <Add-your-email-here>
   # Name of a secret used to store the ACME account private key
   privateKeySecretRef:
     name: letsencrypt # Adjust if not  Let's Encrypt
   # Enable the HTTP-01 challenge provider
   solvers:
   - http01:
       ingress:
         class:  nginx # Adjust if not Nginx Ingress Controller
After downloading the backend-anynines.template.yaml file, replace the indicated placeholder values denoted by <>
and then execute the following command to apply the file:
kubectl apply -f backend-anynines.yaml
Setup Tenant cluster
Binding a Consumer Cluster (Interactive)
We use kube-bind to bind a9s Kubernetes API into consumer cluster.
In order to utilize the kubectl bind command, you'll need to have the kubectl-bind binary installed and properly
added to your system's path.
Download the appropriate kubectl-bind binary for your system's architecture from the provided options:
Make sure to use the binary from one of the links below, as the current release on GitHub is outdated and does not provide all features required!
- MacOS
- Linux
- Windows
Download links:
Open the folder to where you downloaded the file and open a terminal window
I. Create a new directory to add to your PATH environment variable
mkdir -p <installation-directory>/bin
II. Give the folder executable permission
chmod 755 <installation-directory>/bin
III. Copy the binary to the newly created folder
cp ./kubectl-bind <installation-directory>/bin
IV. Add the path to PATH environment variable
export PATH=$PATH:<installation-directory>/bin
V. If everything is configured correctly you should see some output when you run the following command
kubectl bind
When running the command above, you might encounter the error message:
'kubectl-bind' can't be opened because Apple cannot check it for malicious software.
To resolve this error, you can follow the instructions provided here.
Download links:
Open the folder to where you downloaded the file and open a terminal window
I. Create a new directory to add to your PATH environment variable
mkdir -p <installation-directory>/bin
II. Give the folder executable permission
chmod 755 <installation-directory>/bin
III. Copy the binary to the newly created folder
cp ./kubectl-bind <installation-directory>/bin
IV. Add the path to PATH environment variable
export PATH=$PATH:<installation-directory>/bin
V. If everything is configured correctly you should see some output when you run the following command
kubectl bind
Download links:
Open the folder to where you downloaded the file and open a terminal window
I. Create a directory anywhere you feel is appropriate and move the executable to that folder.
II. Copy the path of the folder containing the executable.
III. Right-click My Computer(either on the Desktop or the Start menu) and click Properties.
IV. In the System Properties dialog box, click the Advanced tab and click Environment Variables.
V. In the top list, scroll down to the PATH variable, select it, and click Edit. Click New and enter PATH for the Variable Name. In the Variable Value box, scroll to the end of the variable. If there is no semi-colon (;) at the end of the current path, add one, and then enter the path to the executable folder. Finally, click OK.
VI. If everything is configured correctly you should see some output when you run the following command
kubectl bind
-
Replace
<backend-host>.kubectl bind http://<backend-host>:443/export --konnector-image=public.ecr.aws/w5n9a2g2/anynines/konnector:v1.3.0 -
Authenticate with provided URL using your OIDC credentials. Grant access in browser and respond
Yesin the terminal to grant required access. Bind one at a time by usingkubectl bindand logging into the browser.
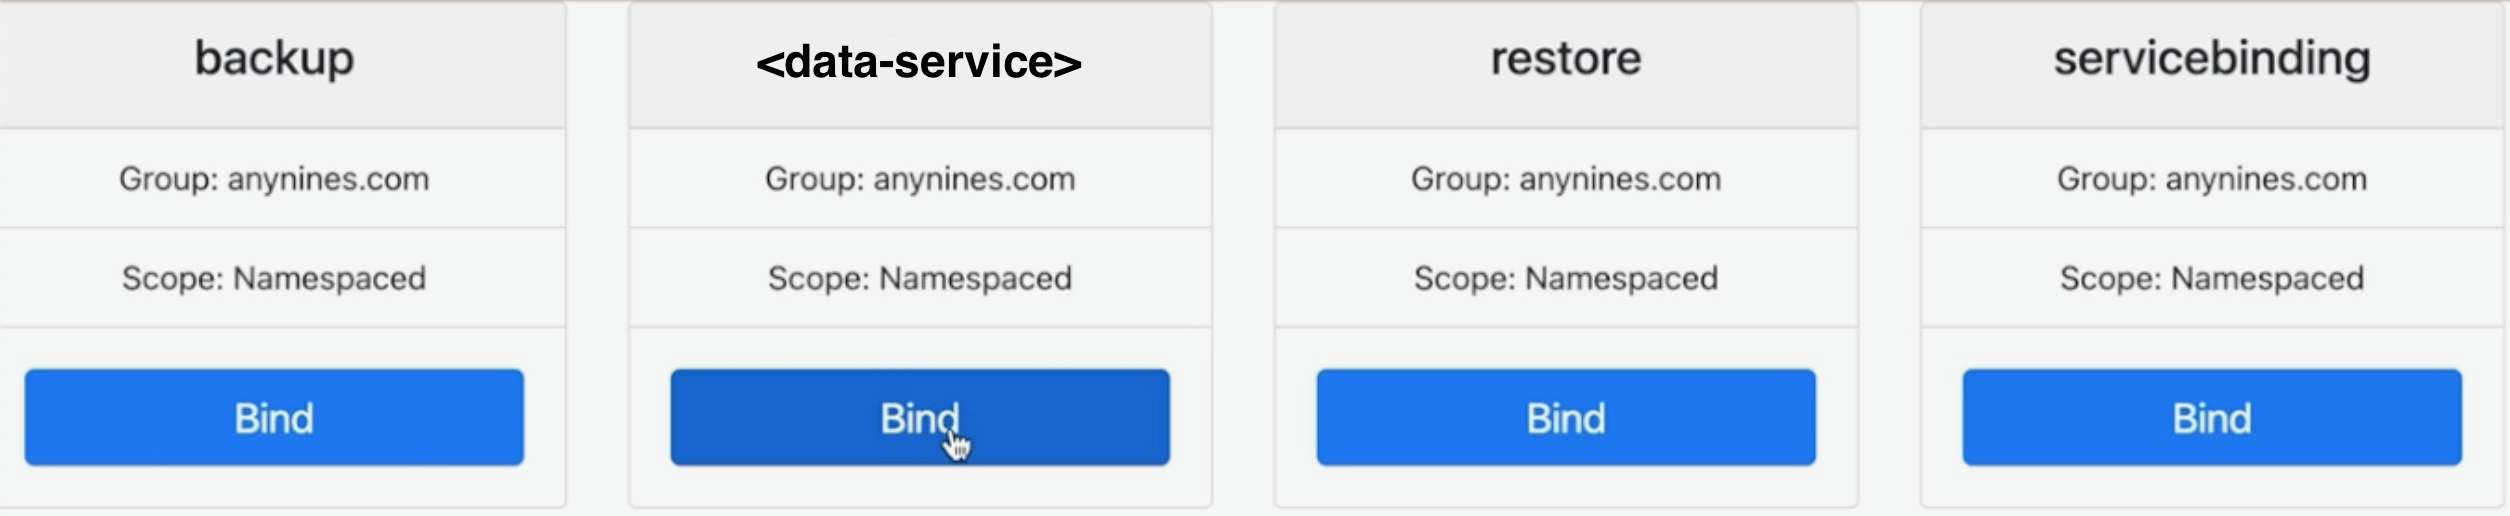
You can select the service to bind by using the web UI, as shown in the following image:
And that's it, you have now successfully configured both the provider and consumer clusters.
Binding a Consumer cluster (non-interactively)
Download the helper utility:
Create a cluster-specific file binding.json containing the configuration for this cluster's binding:
{
  "clusterID": "dummy-",
  "apis": [
    { "group": "anynines.com", "resource": "logme2instances" },
    { "group": "anynines.com", "resource": "mariadbinstances" },
    { "group": "anynines.com", "resource": "messaginginstances" },
    { "group": "anynines.com", "resource": "mongodbinstances" },
    { "group": "anynines.com", "resource": "postgresqlinstances" },
    { "group": "anynines.com", "resource": "prometheusinstances" },
    { "group": "anynines.com", "resource": "redisinstances" },
    { "group": "anynines.com", "resource": "searchinstances" },
    { "group": "anynines.com", "resource": "servicebindings" },
    { "group": "anynines.com", "resource": "backups" },
    { "group": "anynines.com", "resource": "restores" }
  ]
}
Please make sure that clusterID is unique.
If you wish not to expose one of the available APIs to the consumer cluster, remove it from the json file.
Now set the following environment variables
| Variable | Value |
|---|---|
OIDC_CLIENT_ID | client ID of the OIDC client credentials client |
OIDC_CLIENT_SECRET | client secret of the OIDC client credentials client |
OIDC_TOKEN_URL | token url of your OIDC server, for example: https://example.com/auth/realms/example/protocol/openid-connect/token |
Invoke the helper utility using
helper bootstrap-env -f ./binding.json -u https://<backend-host>/bind-noninteractive --write-kubeconfig=./provider.kfg.yaml > all.yaml
Note that the command outputs to stdout, and that the output is redirected to a file we will need later.
The optional --write-kubeconfig flag is used to access the binding before the creation of the consumer cluster. If that is not required, the flag can be omitted. If you want to do that, please refer to this chapter before completing the final step.
Once the consumer cluster is available, the bindings can be created by applying the contents of all.yaml to the consumer cluster.
The file may need to be applied twice, as it contains a CustomResourceDefinition that needs to be installed before objects of it's type can be applied.
Preparing the binding before cluster creation
In case you want to create instances in the binding before the consumer cluster is available, you can use the helper again. First create a namespace within the binding. This will be the namespace the objects appear in on your consumer cluster after creation.
helper create-ns --kubeconfig ./provider.kfg.yaml -n <your-namespace-name>
The helper will output a namespace name on the provider cluster to stdout. Please use that namespace name when interacting with the binding.
You can now use kubectl commands with the kubeconfig provider.kfg.yaml to interact with the binding and create your instances, service bindings etc. The API should be usable as if on a consumer cluster, and depending on the network setup, the instances created should be accessible via service bindings.
Example:
kubectl --kubeconfig=./provider.kfg.yaml apply -f my-instance.yaml
kubectl --kubeconfig=./provider.kfg.yaml apply -f my-service-binding.yaml
kubectl --kubeconfig=./provider.kfg.yaml get secret my-service-binding-creds -oyaml
Coming soon
Platform operators will soon have access to new Kubernetes-integrated features for managing a9s Data Services, including configuration options for disk and memory usage, streamlined updates, and robust disaster recovery. Additionally, platform operators will be able to monitor and log services by collecting metrics and retrieving logs.